Compared with the precision loss caused by post-training quantization because it is not the global optimal, QAT quantization perception training can achieve the global optimal based on loss optimization and reduce the quantization precision loss as far as possible. The basic principle is as follows:In fp32 model training, weight and activation errors caused by inference quantization are introduced in advance, and task loss is used to optimize learnable weight and quantized scale and zp values on the training set. Even under the influence of this quantization error, task loss can reach relatively low loss value through learning.In this way, when the real inference deployment of quantization later, because the error introduced by quantization has already been well adapted in the training, as long as the inference and the calculation of training can be guaranteed to be completely aligned, theoretically, there will be no precision loss in the inference quantization.
tpu-mlir QAT implementation scheme and characteristics
Main body flow
During user training, model QAT quantization API is called to modify the training model:In reasoning, after op fusion, a pseudo-quantization node is inserted before the input (including weight and bias) of the op that needs to be quantized (the quantization parameters of this node can be configured, such as per-chan/layer, symmetry or not, number of quantization bits, etc.), and then the user uses the modified model for normal training process. After completing a few rounds of training,Call the transformation deployment API interface to convert the trained model into the FP32-weighted onnx model, extract the parameters from the pseudo-quantization node and export them to the quantization parameter text file. Finally, input the optimized onnx model and the quantization parameter file into the tpu-mlir tool chain, and convert and deploy according to the post-training quantization method mentioned above.
Features of the Scheme
Feature 1:Based on pytorch;QAT is an additional finetune part of the training pipeline, and only deep integration with the training environment can facilitate users to use various scenarios. Considering pytorch has the most extensive usage rate, the current scheme is based on pytorch only. If qat supports other frameworks in the future, the scheme will be very different.Its trace and module replacement mechanisms are deeply dependent on the support of the native training platform.
Feature 2:Users basically have no sense;Different from earlier schemes that require deep manual intervention in model transformation, this scheme based on pytorch fx can automatically complete model trace, pseudo-quantization node insertion, custom module replacement and other operations. In most cases, users can complete model transformation with one click using the default configuration.
Feature 3:This scheme is based on Sensetime’s open source mqbench qat training framework, which has a certain community foundation and is convenient for industry and academia to evaluate reasoning performance and accuracy on our tpu.
Installation Method
Install from source
1、Run the command to get the latest code on github:git clone https://github.com/sophgo/MQBench。
2、Execute after entering the MQBench directory:
pip install -r requirements.txt  #Note: torch version 1.10.0 is currently required
python setup.py install
3、If python -c ‘import mqbench’ does not return any error, the installation is correct. If the installation is incorrect, run pip uninstall mqbench and try again.
Add the following python module import interface to the training file:
#Initializing Interface
from mqbench.prepare_by_platform import prepare_by_platform, BackendType
#Calibrate and quantify switches
from mqbench.utils.state import enable_calibration, enable_quantization
#Transform Deployment interface
from mqbench.convert_deploy import convert_deploy
#Use the pre-trained resnet18 model in torchvision model zoo
model = torchvision.models.__dict__["resnet18"](pretrained=True)
Backend = BackendType.sophgo_tpu
#1.trace model and then add quantization nodes in a specific way based on the requirements of sophgo_tpu hardware
model_quantized = prepare_by_platform(model, Backend)
When sophgo_tpu backend is selected on the above interface, the third parameter prepare_custom_config_dict of this interface is not configured by default. In this case, the default quantization configuration is shown as the following figure:
In the above figure, items in the dict behind sophgo_tpu in order of top to bottom meaning are:
1、The weight quantization scheme is: per-chan symmetric 8bit quantization, the scale coefficient is not power-of-2, but arbitrary
2、The activation quantization scheme is per-layer asymmetric 8bit quantization
5/6、The dynamic range statistics and scale calculation scheme of weights are as follows: MinMaxObserver, and the activation is EMAMinMaxObserver with moving average
Step 2: Calibration and quantization training
#1.Turn on the calibration switch to allow the pytorch observer object to collect the activation distribution and calculate the initial scale and zp when reasoning on the model
enable_calibration(model_quantized)
# iterations of calibration
for i, (images, _) in enumerate(cali_loader):
    model_quantized(images)   #All you need is forward reasoning
#3.After the pseudo-quantization switch is turned on, the quantization error will be introduced by invoking the QuantizeBase subobject to conduct the pseudo-quantization operation when reasoning on the model
enable_quantization(model_quantized)
# iterations of training
for i, (images, target) in enumerate(train_loader):
    #Forward reasoning and calculation loss
    output = model_quantized(images)
    loss = criterion(output, target)
    #Back to back propagation gradient
    loss.backward()
    #Update weights and pseudo-quantization parameters
    optimizer.step()
Step 3: Export tuned fp32 model
#Here the batch-size can be adjusted according to the need, do not have to be consistent with the training batch-size
input_shape={‘data’: [4, 3, 224, 224]}
#4. Before export, the conv+bn layer is fused (conv+bn is true fusion when train is used in the front), and the parameters in the pseudo-quantization node are saved to the parameter file, and then removed。
convert_deploy(model_quantized, backend, input_shape)
Step 4: Initiate the training
Set reasonable training hyperparameters. The suggestions are as follows:
–epochs=1:About 1~3 can be;
–lr=1e-4:The learning rate should be the learning rate when fp32 converges, or even lower;
–optim=sgd:The default is sgd;
Step 5: Transform deployment
The transformation deployment to sophg-tpu hardware was completed using the model_transform.py and model_deploy.py scripts of tpu-mlir;
Use Examples-resnet18
Run example/imagenet_example/main.py to qat train resent18 as follows:
The command output log above contains the following(Original onnx model accuracy) accuracy information of the original model (it can be compared with the accuracy on the official webpage to confirm the correct training environment, such as the official nominal name:Acc@1 69.76 Acc@5 89.08,The link is:https://pytorch.apachecn.org/#/docs/1.0/torchvision_models):
After completing the qat training, the eval accuracy of the running band quantization node, theoretically the int8 accuracy of the tpu-mlir should be exactly aligned with this, as shown in the figure(resnet18 qat training accuracy) below:
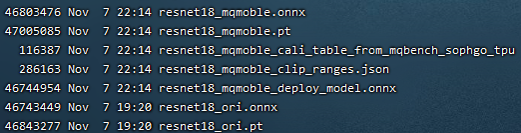
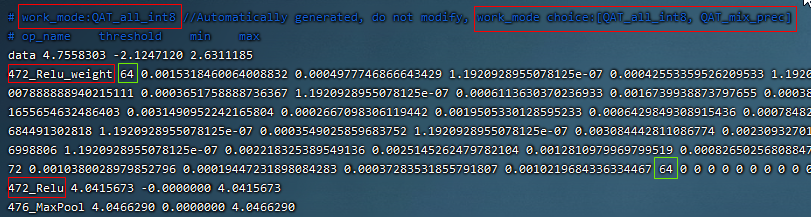
The one with _ori in the figure above is the original pt of pytorch model zoo and the transferred onnx file. This resnet18_ori.onnx is quantified by PTQ with the tpu-mlir tool chain, and its symmetry and asymmetry quantization accuracy are measured as the baseline and resnet18_mqmoble_cali_table_from_mqbench_sophgo_tpu is the exported quantization parameter file with the following contents(resnet18 Sample qat quantization parameter table):
a、In the red box of the first row in the figure above, work_mode is QAT_all_int8, indicating int8 quantization of the whole network. It can be selected from [QAT_all_int8, QAT_mix_prec], and quantization parameters such as symmetry and asymmetry will also be included。
b、In the figure above, 472_Relu_weight represents the QAT-tuned scale and zp parameters of conv weight. The first 64 represents the scale followed by 64, and the second 64 represents the zp followed by 64.tpu-mlir imports the weight_scale attribute of the top weight. If this attribute exists in the int8 lowering time, it is directly used. When it does not, it is recalculated according to the maximum lowering value。
c、In the case of asymmetric quantization, min and max above are calculated according to the scale, zp, qmin and qmax tuned by the activated qat. threshold is calculated according to the activated scale in the case of symmetric quantization, and both are not valid at the same time。
Tpu-mlir QAT test environment
Adding a cfg File
Go to the tpu-mlir/regression/eval directory and add {model_name}_qat.cfg to the qat_config subdirectory. For example, the contents of the resnet18_qat.cfg file are as follows:
dataset=${REGRESSION_PATH}/dataset/ILSVRC2012
test_input=${REGRESSION_PATH}/image/cat.jpg
input_shapes=[[1,3,224,224]]  #Modified according to the actual shape
#The following is the image preprocessing parameters, fill in according to the actual situation
resize_dims=256,256
mean=123.675,116.28,103.53
scale=0.0171,0.0175,0.0174
pixel_format=rgb
int8_sym_tolerance=0.97,0.80
int8_asym_tolerance=0.98,0.80
debug_cmd=use_pil_resize
You can also add {model_name}_qat_ori.cfg file: Quantify the original pytorch model as baseline, which can be exactly the same as {model_name}_qat.cfg above;
Modify and execute run_eval.py
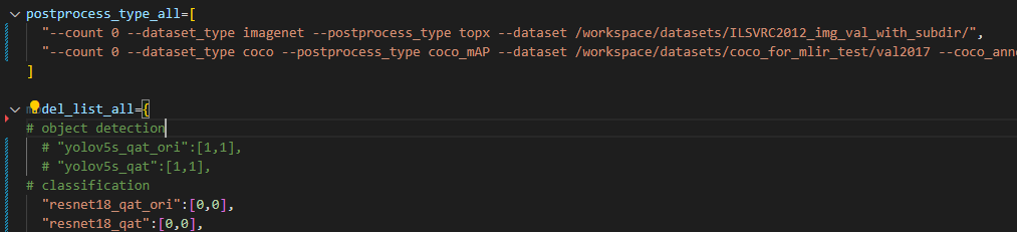
In the following figure, fill in more command strings of different precision evaluation methods in postprocess_type_all, such as the existing imagenet classification and coco detection precision calculation strings in the figure;In the following figure, model_list_all fills in the mapping of the model name to the parameter, for example:resnet18_qat’s [0,0], where the first parameter represents the first command string in postprocess_type_all, and the second parameter represents the first directory in qat_model_path (separated by commas):
After configuring the postprocess_type_all and model_list_all arrays as needed, execute the following run_eval.py command:
python3 run_eval.py
    --qat_eval        #In qat validation mode, the default is to perform regular model accuracy testing using the configuration in the tpu-mlir/regression/config
    --fast_test       #Quick test before the official test (only test the accuracy of 30 graphs) to confirm that all cases can run
    --pool_size 20    #By default, 10 processes run. If the machine has many idle resources, you can configure more
    --batch_size 10   #qat exports the batch-size of the model. The default is 1
    --qat_model_path '/workspace/classify_models/,/workspace/yolov5/qat_models'  #Directory of the qat model,For example, the value of model_list_all[' resnet18_qat '][1] is 0, indicating the first directory address of the model target in the qat_model_path:/workspace/classify_models/
    --debug_cmd use_pil_resize      #Use pil resize
After or during the test, view the model_eval script output log file starting with log_ in the subdirectory named {model_name}_qat,For example, log_resnet18_qat.mlir indicates the log of testing resnet18_qat.mlir in the directory.log_resnet18_qat_bm1684x_tpu_int8_sym.mlir Indicates the test log of resnet18_qat_bm1684x_tpu_int8_sym.mlir in this directory.
Use Examples-yolov5s
Similar to resnet18, run the following command in example/yolov5_example to start qat training: