CV18xx Guidance
CV18xx series chip currently supports ONNX and Caffe models but not TFLite models. In terms of quantization, CV18xx supports BF16 and asymmetric INT8 format. This chapter takes the CV183X as an example to introduce the compilation and runtime sample of the CV18xx series chip.
Compile yolov5 model
TPU-MLIR Setup
The following operations need to be in a Docker container. For the use of Docker, please refer to Setup Docker Container.
$ tar zxf tpu-mlir_xxxx.tar.gz
$ source tpu-mlir_xxxx/envsetup.sh
envsetup.sh adds the following environment variables:
Name | Value | Explanation |
|---|---|---|
TPUC_ROOT | tpu-mlir_xxx | The location of the SDK package after decompression |
MODEL_ZOO_PATH | ${TPUC_ROOT}/../model-zoo | The location of the model-zoo folder, at the same level as the SDK |
envsetup.sh modifies the environment variables as follows:
export PATH=${TPUC_ROOT}/bin:$PATH
export PATH=${TPUC_ROOT}/python/tools:$PATH
export PATH=${TPUC_ROOT}/python/utils:$PATH
export PATH=${TPUC_ROOT}/python/test:$PATH
export PATH=${TPUC_ROOT}/python/samples:$PATH
export LD_LIBRARY_PATH=$TPUC_ROOT/lib:$LD_LIBRARY_PATH
export PYTHONPATH=${TPUC_ROOT}/python:$PYTHONPATH
export MODEL_ZOO_PATH=${TPUC_ROOT}/../model-zoo
Prepare working directory
Create the model_yolov5s directory in the same directory as tpu-mlir, and put the model and image files in this directory.
The operation is as follows:
$ mkdir model_yolov5s && cd model_yolov5s
$ cp $TPUC_ROOT/regression/model/yolov5s.onnx .
$ cp -rf $TPUC_ROOT/regression/dataset/COCO2017 .
$ cp -rf $TPUC_ROOT/regression/image .
$ mkdir workspace && cd workspace
Here $TPUC_ROOT is an environment variable, corresponding to the tpu-mlir_xxxx directory.
ONNX to MLIR
If the input is an image, we need to learn the preprocessing of the model before conversion. If the model uses the preprocessed npz file as input, there is no need to consider preprocessing. The preprocessing process is expressed as follows ( \(x\) stands for input):
The input of yolov5 on the official website is rgb image, each value of it will be multiplied by 1/255, and converted into mean and scale corresponding to 0.0,0.0,0.0 and 0.0039216,0.0039216,0.0039216.
The model conversion command is as follows:
$ model_transform.py \
    --model_name yolov5s \
    --model_def ../yolov5s.onnx \
    --input_shapes [[1,3,640,640]] \
    --mean 0.0,0.0,0.0 \
    --scale 0.0039216,0.0039216,0.0039216 \
    --keep_aspect_ratio \
    --pixel_format rgb \
    --output_names 350,498,646 \
    --test_input ../image/dog.jpg \
    --test_result yolov5s_top_outputs.npz \
    --mlir yolov5s.mlir
For the argument description of model_transform, refer to the section “Compile ONNX Model - ONNX to MLIR”.
MLIR to BF16 Model
Convert the mlir file to the cvimodel of bf16, the operation is as follows:
$ model_deploy.py \
    --mlir yolov5s.mlir \
    --quantize BF16 \
    --chip cv183x \
    --test_input yolov5s_in_f32.npz \
    --test_reference yolov5s_top_outputs.npz \
    --tolerance 0.99,0.99 \
    --model yolov5s_cv183x_bf16.cvimodel
For the argument description of model_deploy.py, refer to the section “Compile ONNX model - MLIR to F32 model”.
MLIR to INT8 Model
Before converting to the INT8 model, you need to do calibration to get the calibration table. The number of input data depends on the situation but is normally around 100 to 1000. Then use the calibration table to generate INT8 symmetric cvimodel.
Here we use the 100 images from COCO2017 as an example to perform calibration:
$ run_calibration.py yolov5s.mlir \
    --dataset ../COCO2017 \
    --input_num 100 \
    -o yolov5s_cali_table
After the operation is completed, a file named ${model_name}_cali_table will be generated, which is used as the input of the following compilation work.
To convert to symmetric INT8 cvimodel model, execute the following command:
$ model_deploy.py \
    --mlir yolov5s.mlir \
    --quantize INT8 \
    --calibration_table yolov5s_cali_table \
    --chip cv183x \
    --test_input yolov5s_in_f32.npz \
    --test_reference yolov5s_top_outputs.npz \
    --tolerance 0.85,0.45 \
    --model yolov5s_cv183x_int8_sym.cvimodel
After compiling, a file named ${model_name}_cv183x_int8_sym.cvimodel will be generated.
Result Comparison
The onnx model is run as follows to get dog_onnx.jpg:
$ detect_yolov5.py \
    --input ../image/dog.jpg \
    --model ../yolov5s.onnx \
    --output dog_onnx.jpg
The FP32 mlir model is run as follows to get dog_mlir.jpg:
$ detect_yolov5.py \
    --input ../image/dog.jpg \
    --model yolov5s.mlir \
    --output dog_mlir.jpg
The BF16 cvimodel is run as follows to get dog_bf16.jpg:
$ detect_yolov5.py \
    --input ../image/dog.jpg \
    --model yolov5s_cv183x_bf16.cvimodel \
    --output dog_bf16.jpg
The INT8 cvimodel is run as follows to get dog_int8.jpg:
$ detect_yolov5.py \
--input ../image/dog.jpg \
--model yolov5s_cv183x_int8_sym.cvimodel \
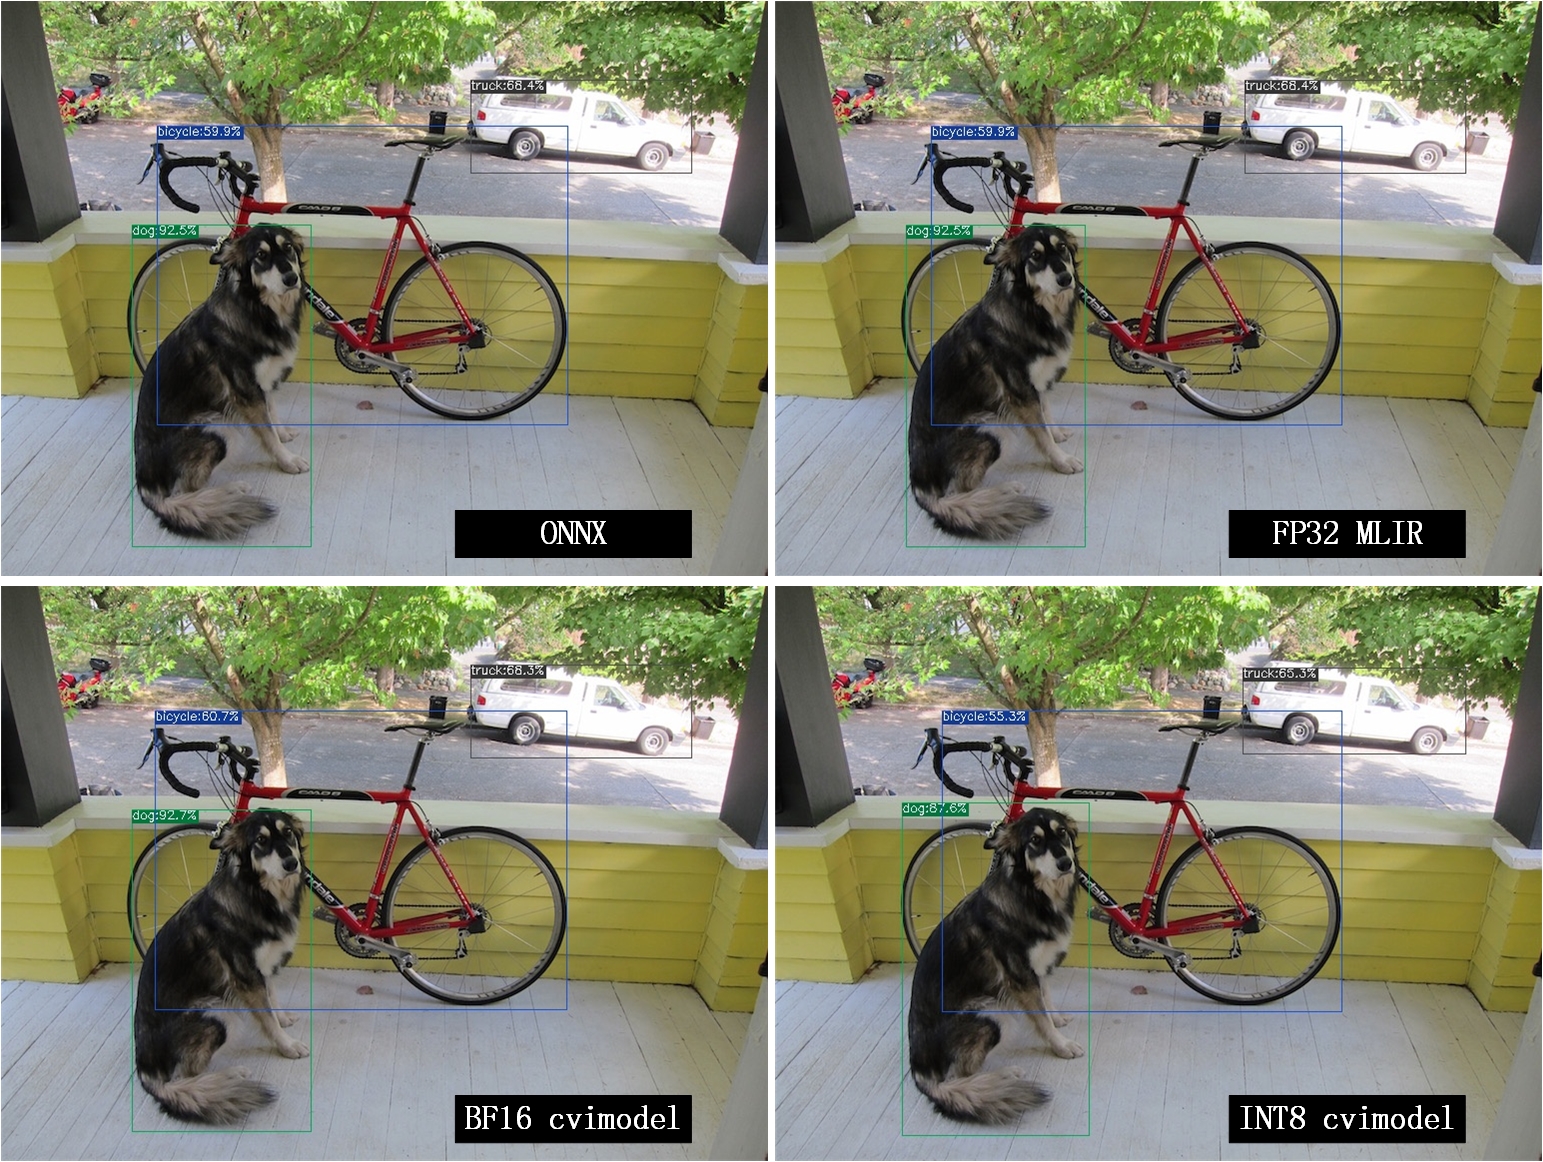
--output dog_int8.jpgThe comparison of the four images is shown in Fig. 9.1, due to the different operating environments, the final effect and accuracy will be slightly different from Fig. 9.1.
The above tutorial introduces the process of TPU-MLIR deploying the ONNX model to the CV18xx series chip. For the conversion process of the Caffe model, please refer to the chapter “Compiling the Caffe Model”. You only need to replace the chip name with the specific CV18xx chip.
Merge cvimodel Files
For the same model, independent cvimodel files can be generated according to the input batch size and resolution(different H and W). However, in order to save storage, you can merge these related cvimodel files into one cvimodel file and share its weight part. The steps are as follows:
Step 0: generate the cvimodel for batch 1
Please refer to the previous section to create a new workspace directory and convert yolov5s to the mlir fp32 model by model_transform.py
Attention :
1.Use the same workspace directory for the cvimodels that need to be merged, and do not share the workspace with other cvimodes that do not need to be merged.
2.In Step 0, Step 1, –merge_weight is required
$ model_transform.py \
    --model_name yolov5s \
    --model_def ../yolov5s.onnx \
    --input_shapes [[1,3,640,640]] \
    --mean 0.0,0.0,0.0 \
    --scale 0.0039216,0.0039216,0.0039216 \
    --keep_aspect_ratio \
    --pixel_format rgb \
    --output_names 350,498,646 \
    --test_input ../image/dog.jpg \
    --test_result yolov5s_top_outputs.npz \
    --mlir yolov5s_bs1.mlir
Use the yolov5s_cali_table generated in preceding sections, or generate calibration table by run_calibration.py.
# Add --merge_weight
 $ model_deploy.py \
     --mlir yolov5s_bs1.mlir \
     --quantize INT8 \
     --calibration_table yolov5s_cali_table \
     --chip cv183x \
     --test_input yolov5s_in_f32.npz \
     --test_reference yolov5s_top_outputs.npz \
     --tolerance 0.85,0.45 \
     --merge_weight \
     --model yolov5s_cv183x_int8_sym_bs1.cvimodel
Step 1: generate the cvimodel for batch 2
Generate mlir fp32 file in the same workspace:
$ model_transform.py \
    --model_name yolov5s \
    --model_def ../yolov5s.onnx \
    --input_shapes [[2,3,640,640]] \
    --mean 0.0,0.0,0.0 \
    --scale 0.0039216,0.0039216,0.0039216 \
    --keep_aspect_ratio \
    --pixel_format rgb \
    --output_names 350,498,646 \
    --test_input ../image/dog.jpg \
    --test_result yolov5s_top_outputs.npz \
    --mlir yolov5s_bs2.mlir
# Add --merge_weight
$ model_deploy.py \
--mlir yolov5s_bs2.mlir \
--quantize INT8 \
--calibration_table yolov5s_cali_table \
--chip cv183x \
--test_input yolov5s_in_f32.npz \
--test_reference yolov5s_top_outputs.npz \
--tolerance 0.85,0.45 \
--merge_weight \
--model yolov5s_cv183x_int8_sym_bs2.cvimodelStep 2: merge the cvimodel of batch 1 and batch 2
Use model_tool to mrege two cvimodel files:
model_tool \
  --combine \
    yolov5s_cv183x_int8_sym_bs1.cvimodel \
    yolov5s_cv183x_int8_sym_bs2.cvimodel \
    -o yolov5s_cv183x_int8_sym_bs1_bs2.cvimodel
Step 3: use the cvimodel through the runtime interface
Use model_tool to check the program id of bs1 and bs2.:
model_tool --info yolov5s_cv183x_int8_sym_bs1_bs2.cvimodelAt runtime, you can run different batch program in the following ways:
CVI_MODEL_HANDEL bs1_handle;
CVI_RC ret = CVI_NN_RegisterModel("yolov5s_cv183x_int8_sym_bs1_bs2.cvimodel", &bs1_handle);
assert(ret == CVI_RC_SUCCESS);
// choice batch 1 program
CVI_NN_SetConfig(bs1_handle, OPTION_PROGRAM_INDEX, 0);
CVI_NN_GetInputOutputTensors(bs1_handle, ...);
....


CVI_MODEL_HANDLE bs2_handle;
// Reuse loaded cvimodel
CVI_RC ret = CVI_NN_CloneModel(bs1_handle, &bs2_handle);
assert(ret == CVI_RC_SUCCESS);
// choice batch 2 program
CVI_NN_SetConfig(bs2_handle, OPTION_PROGRAM_INDEX, 1);
CVI_NN_GetInputOutputTensors(bs2_handle, ...);
...

// clean up bs1_handle and bs2_handle
CVI_NN_CleanupModel(bs1_handle);
CVI_NN_CleanupModel(bs2_handle);
Overview:
Using the above command, you can merge either the same models or different models
The main steps are:
When generating a cvimodel through model_deploy.py, add the –merge_weight parameter.
The work directory of the model to be merged must be the same, and do not clean up any intermediate files before merging the models(Reuse the previous model’s weight is implemented through the intermediate file _weight_map.csv).
Use model_tool to merge cvimodels.
Compile and Run the Runtime Sample
This part introduces how to compile and run the runtime samples, include how to cross-compile samples for EVB board and how to compile and run samples in docker. The following 4 samples are included:
Sample-1 : classifier (mobilenet_v2)
Sample-2 : classifier_bf16 (mobilenet_v2)
Sample-3 : classifier fused preprocess (mobilenet_v2)
Sample-4 : classifier multiple batch (mobilenet_v2)
1) Run the provided pre-build samples
The following files are required:
cvitek_tpu_sdk_[cv182x|cv182x_uclibc|cv183x|cv181x_glibc32|cv181x_musl_riscv64_rvv|cv180x_musl_riscv64_rvv|cv181x_glibc_riscv64].tar.gz
cvimodel_samples_[cv182x|cv183x|cv181x|cv180x].tar.gz
Select the required files according to the chip type and load them into the EVB file system. Execute them on the Linux console of EVB. Here, we take CV183x as an example.
Unzip the model file (delivered in cvimodel format) and the TPU_SDK used by samples. Enter into the samples directory to execute the test. The process is as follows:
#env
tar zxf cvimodel_samples_cv183x.tar.gz
export MODEL_PATH=$PWD/cvimodel_samples
tar zxf cvitek_tpu_sdk_cv183x.tar.gz
export TPU_ROOT=$PWD/cvitek_tpu_sdk
cd cvitek_tpu_sdk && source ./envs_tpu_sdk.sh
# get cvimodel info
cd samples
./bin/cvi_sample_model_info $MODEL_PATH/mobilenet_v2.cvimodel

####################################
# sample-1 : classifier
###################################
./bin/cvi_sample_classifier \
    $MODEL_PATH/mobilenet_v2.cvimodel \
    ./data/cat.jpg \
    ./data/synset_words.txt

# TOP_K[5]:
#  0.326172, idx 282, n02123159 tiger cat
#  0.326172, idx 285, n02124075 Egyptian cat
#  0.099609, idx 281, n02123045 tabby, tabby cat
#  0.071777, idx 287, n02127052 lynx, catamount
#  0.041504, idx 331, n02326432 hare

####################################
# sample-2 : classifier_bf16
###################################
./bin/cvi_sample_classifier_bf16 \
    $MODEL_PATH/mobilenet_v2_bf16.cvimodel \
    ./data/cat.jpg \
    ./data/synset_words.txt

# TOP_K[5]:
#  0.314453, idx 285, n02124075 Egyptian cat
#  0.040039, idx 331, n02326432 hare
#  0.018677, idx 330, n02325366 wood rabbit, cottontail, cottontail rabbit
#  0.010986, idx 463, n02909870 bucket, pail
#  0.010986, idx 852, n04409515 tennis ball


############################################
# sample-3 : classifier fused preprocess
############################################
./bin/cvi_sample_classifier_fused_preprocess \
    $MODEL_PATH/mobilenet_v2_fused_preprocess.cvimodel \
    ./data/cat.jpg \
    ./data/synset_words.txt

# TOP_K[5]:
#  0.326172, idx 282, n02123159 tiger cat
#  0.326172, idx 285, n02124075 Egyptian cat
#  0.099609, idx 281, n02123045 tabby, tabby cat
#  0.071777, idx 287, n02127052 lynx, catamount
#  0.041504, idx 331, n02326432 hare

############################################
# sample-4 : classifier multiple batch
############################################
./bin/cvi_sample_classifier_multi_batch \
    $MODEL_PATH/mobilenet_v2_bs1_bs4.cvimodel \
    ./data/cat.jpg \
    ./data/synset_words.txt

# TOP_K[5]:
#  0.326172, idx 282, n02123159 tiger cat
#  0.326172, idx 285, n02124075 Egyptian cat
#  0.099609, idx 281, n02123045 tabby, tabby cat
#  0.071777, idx 287, n02127052 lynx, catamount
#  0.041504, idx 331, n02326432 hare
At the same time, the script is provided as a reference, and the execution effect is the same as that of direct operation, as follows:
./run_classifier.sh
./run_classifier_bf16.sh
./run_classifier_fused_preprocess.sh
./run_classifier_multi_batch.sh
There are more samples can be refered in the cvitek_tpu_sdk/samples/samples_extra:
./bin/cvi_sample_detector_yolo_v3_fused_preprocess \
    $MODEL_PATH/yolo_v3_416_fused_preprocess_with_detection.cvimodel \
    ./data/dog.jpg \
    yolo_v3_out.jpg

./bin/cvi_sample_detector_yolo_v5_fused_preprocess \
    $MODEL_PATH/yolov5s_fused_preprocess.cvimodel \
    ./data/dog.jpg \
    yolo_v5_out.jpg

./bin/cvi_sample_detector_yolox_s \
    $MODEL_PATH/yolox_s.cvimodel \
    ./data/dog.jpg \
    yolox_s_out.jpg

./bin/cvi_sample_alphapose_fused_preprocess \
    $MODEL_PATH/yolo_v3_416_fused_preprocess_with_detection.cvimodel \
    $MODEL_PATH/alphapose_fused_preprocess.cvimodel \
    ./data/pose_demo_2.jpg \
    alphapose_out.jpg

./bin/cvi_sample_fd_fr_fused_preprocess \
    $MODEL_PATH/retinaface_mnet25_600_fused_preprocess_with_detection.cvimodel \
    $MODEL_PATH/arcface_res50_fused_preprocess.cvimodel \
    ./data/obama1.jpg \
    ./data/obama2.jpg
2) Cross-compile samples
The source code is given in the released packages. You can cross-compile the samples’ source code in the docker environment and run them on EVB board according to the following instructions.
The following files are required in this part:
cvitek_tpu_sdk_[cv182x|cv182x_uclibc|cv183x|cv181x_glibc32|cv181x_musl_riscv64_rvv|cv180x_musl_riscv64_rvv]].tar.gz
cvitek_tpu_samples.tar.gz
aarch 64-bit (such as cv183x aarch64-bit platform)
Prepare TPU sdk:
tar zxf host-tools.tar.gz
tar zxf cvitek_tpu_sdk_cv183x.tar.gz
export PATH=$PWD/host-tools/gcc/gcc-linaro-6.3.1-2017.05-x86_64_aarch64-linux-gnu/bin:$PATH
export TPU_SDK_PATH=$PWD/cvitek_tpu_sdk
cd cvitek_tpu_sdk && source ./envs_tpu_sdk.sh && cd ..
Compile samples and install them into “install_samples” directory:
tar zxf cvitek_tpu_samples.tar.gz
cd cvitek_tpu_samples
mkdir build_soc
cd build_soc
cmake -G Ninja \
    -DCMAKE_BUILD_TYPE=RELEASE \
    -DCMAKE_C_FLAGS_RELEASE=-O3 \
    -DCMAKE_CXX_FLAGS_RELEASE=-O3 \
    -DCMAKE_TOOLCHAIN_FILE=$TPU_SDK_PATH/cmake/toolchain-aarch64-linux.cmake \
    -DTPU_SDK_PATH=$TPU_SDK_PATH \
    -DOPENCV_PATH=$TPU_SDK_PATH/opencv \
    -DCMAKE_INSTALL_PREFIX=../install_samples \
    ..
cmake --build . --target install
arm 32-bit (such as 32-bit cv183x/cv182x platform)
Prepare TPU sdk:
tar zxf host-tools.tar.gz
tar zxf cvitek_tpu_sdk_cv182x.tar.gz
export TPU_SDK_PATH=$PWD/cvitek_tpu_sdk
export PATH=$PWD/host-tools/gcc/gcc-linaro-6.3.1-2017.05-x86_64_arm-linux-gnueabihf/bin:$PATH
cd cvitek_tpu_sdk && source ./envs_tpu_sdk.sh && cd ..
If docker version < 1.7, please update 32-bit system library(just once):
dpkg --add-architecture i386
apt-get update
apt-get install libc6:i386 libncurses5:i386 libstdc++6:i386
Compile samples and install them into install_samples directory:
tar zxf cvitek_tpu_samples.tar.gz
cd cvitek_tpu_samples
mkdir build_soc
cd build_soc
cmake -G Ninja \
    -DCMAKE_BUILD_TYPE=RELEASE \
    -DCMAKE_C_FLAGS_RELEASE=-O3 \
    -DCMAKE_CXX_FLAGS_RELEASE=-O3 \
    -DCMAKE_TOOLCHAIN_FILE=$TPU_SDK_PATH/cmake/toolchain-linux-gnueabihf.cmake \
    -DTPU_SDK_PATH=$TPU_SDK_PATH \
    -DOPENCV_PATH=$TPU_SDK_PATH/opencv \
    -DCMAKE_INSTALL_PREFIX=../install_samples \
    ..
cmake --build . --target install
uclibc 32-bit platform (such as cv182x uclibc platform)
Prepare TPU sdk:
tar zxf host-tools.tar.gz
tar zxf cvitek_tpu_sdk_cv182x_uclibc.tar.gz
export TPU_SDK_PATH=$PWD/cvitek_tpu_sdk
export PATH=$PWD/host-tools/gcc/arm-cvitek-linux-uclibcgnueabihf/bin:$PATH
cd cvitek_tpu_sdk && source ./envs_tpu_sdk.sh && cd ..
If docker version < 1.7, please update 32-bit system library(just once):
dpkg --add-architecture i386
apt-get update
apt-get install libc6:i386 libncurses5:i386 libstdc++6:i386
Compile samples and install them into install_samples directory:
tar zxf cvitek_tpu_samples.tar.gz
cd cvitek_tpu_samples
mkdir build_soc
cd build_soc
cmake -G Ninja \
    -DCMAKE_BUILD_TYPE=RELEASE \
    -DCMAKE_C_FLAGS_RELEASE=-O3 \
    -DCMAKE_CXX_FLAGS_RELEASE=-O3 \
    -DCMAKE_TOOLCHAIN_FILE=$TPU_SDK_PATH/cmake/toolchain-linux-uclibc.cmake \
    -DTPU_SDK_PATH=$TPU_SDK_PATH \
    -DOPENCV_PATH=$TPU_SDK_PATH/opencv \
    -DCMAKE_INSTALL_PREFIX=../install_samples \
    ..
cmake --build . --target install
riscv 64-bit musl platform (such as cv180x/cv181x riscv 64-bit musl platform)
Prepare TPU sdk:
tar zxf host-tools.tar.gz
tar zxf cvitek_tpu_sdk_cv181x_musl_riscv64_rvv.tar.gz
export TPU_SDK_PATH=$PWD/cvitek_tpu_sdk
export PATH=$PWD/host-tools/gcc/riscv64-linux-musl-x86_64/bin:$PATH
cd cvitek_tpu_sdk && source ./envs_tpu_sdk.sh && cd ..
Compile samples and install them into install_samples directory:
tar zxf cvitek_tpu_samples.tar.gz
cd cvitek_tpu_samples
mkdir build_soc
cd build_soc
cmake -G Ninja \
    -DCMAKE_BUILD_TYPE=RELEASE \
    -DCMAKE_C_FLAGS_RELEASE=-O3 \
    -DCMAKE_CXX_FLAGS_RELEASE=-O3 \
    -DCMAKE_TOOLCHAIN_FILE=$TPU_SDK_PATH/cmake/toolchain-riscv64-linux-musl-x86_64.cmake \
    -DTPU_SDK_PATH=$TPU_SDK_PATH \
    -DOPENCV_PATH=$TPU_SDK_PATH/opencv \
    -DCMAKE_INSTALL_PREFIX=../install_samples \
    ..
cmake --build . --target install
riscv 64-bit glibc platform(such as cv180x/cv181x 64-bit glibc platform)
Prepare TPU sdk:
tar zxf host-tools.tar.gz
tar zxf cvitek_tpu_sdk_cv181x_glibc_riscv64.tar.gz
export TPU_SDK_PATH=$PWD/cvitek_tpu_sdk
export PATH=$PWD/host-tools/gcc/riscv64-linux-x86_64/bin:$PATH
cd cvitek_tpu_sdk && source ./envs_tpu_sdk.sh && cd ..
Compile samples and install them into install_samples directory:
tar zxf cvitek_tpu_samples.tar.gz
cd cvitek_tpu_samples
mkdir build_soc
cd build_soc
cmake -G Ninja \
    -DCMAKE_BUILD_TYPE=RELEASE \
    -DCMAKE_C_FLAGS_RELEASE=-O3 \
    -DCMAKE_CXX_FLAGS_RELEASE=-O3 \
    -DCMAKE_TOOLCHAIN_FILE=$TPU_SDK_PATH/cmake/toolchain-riscv64-linux-x86_64.cmake \
    -DTPU_SDK_PATH=$TPU_SDK_PATH \
    -DOPENCV_PATH=$TPU_SDK_PATH/opencv \
    -DCMAKE_INSTALL_PREFIX=../install_samples \
    ..
cmake --build . --target install
1) Run samples in docker environment
The following files are required:
cvitek_mlir_ubuntu-18.04.tar.gz
cvimodel_samples_[cv182x|cv183x|cv181x|cv180x].tar.gz
cvitek_tpu_samples.tar.gz
Prepare TPU sdk:
tar zxf cvitek_mlir_ubuntu-18.04.tar.gz
source cvitek_mlir/cvitek_envs.sh
Compile samples and install them into install_samples directory:
tar zxf cvitek_tpu_samples.tar.gz
cd cvitek_tpu_samples
mkdir build_soc
cd build_soc
cmake -G Ninja \
   -DCMAKE_BUILD_TYPE=RELEASE \
   -DCMAKE_C_FLAGS_RELEASE=-O3 \
   -DCMAKE_CXX_FLAGS_RELEASE=-O3 \
   -DTPU_SDK_PATH=$MLIR_PATH/tpuc \
   -DCNPY_PATH=$MLIR_PATH/cnpy \
   -DOPENCV_PATH=$MLIR_PATH/opencv \
   -DCMAKE_INSTALL_PREFIX=../install_samples \
   ..
cmake --build . --target install
Run samples:
# envs
tar zxf cvimodel_samples_cv183x.tar.gz
export MODEL_PATH=$PWD/cvimodel_samples
source cvitek_mlir/cvitek_envs.sh

# get cvimodel info
cd ../install_samples
./bin/cvi_sample_model_info $MODEL_PATH/mobilenet_v2.cvimodel
Other samples are samely to the instructions of running on EVB board.