Overview#
The BM1684X processor has successfully deployed the C++ code of ChatGLM2-6B, the code implementation link is: https://github.com/sophgo/ChatGLM2-TPU.
This article summarizes some technical points in the process of deploying this model. First, it covers the overall operation process of ChatGLM2-6B, then introduces how to convert this dynamic network into a static network form, followed by how to export this model to ONNX.
Finally, it discusses how to use the TPU-MLIR compiler to compile the network and how to write application programs in C++ code. You can understand this directly by looking at the source code, so it will not be discussed here.
ChatGLM2-6B Process#

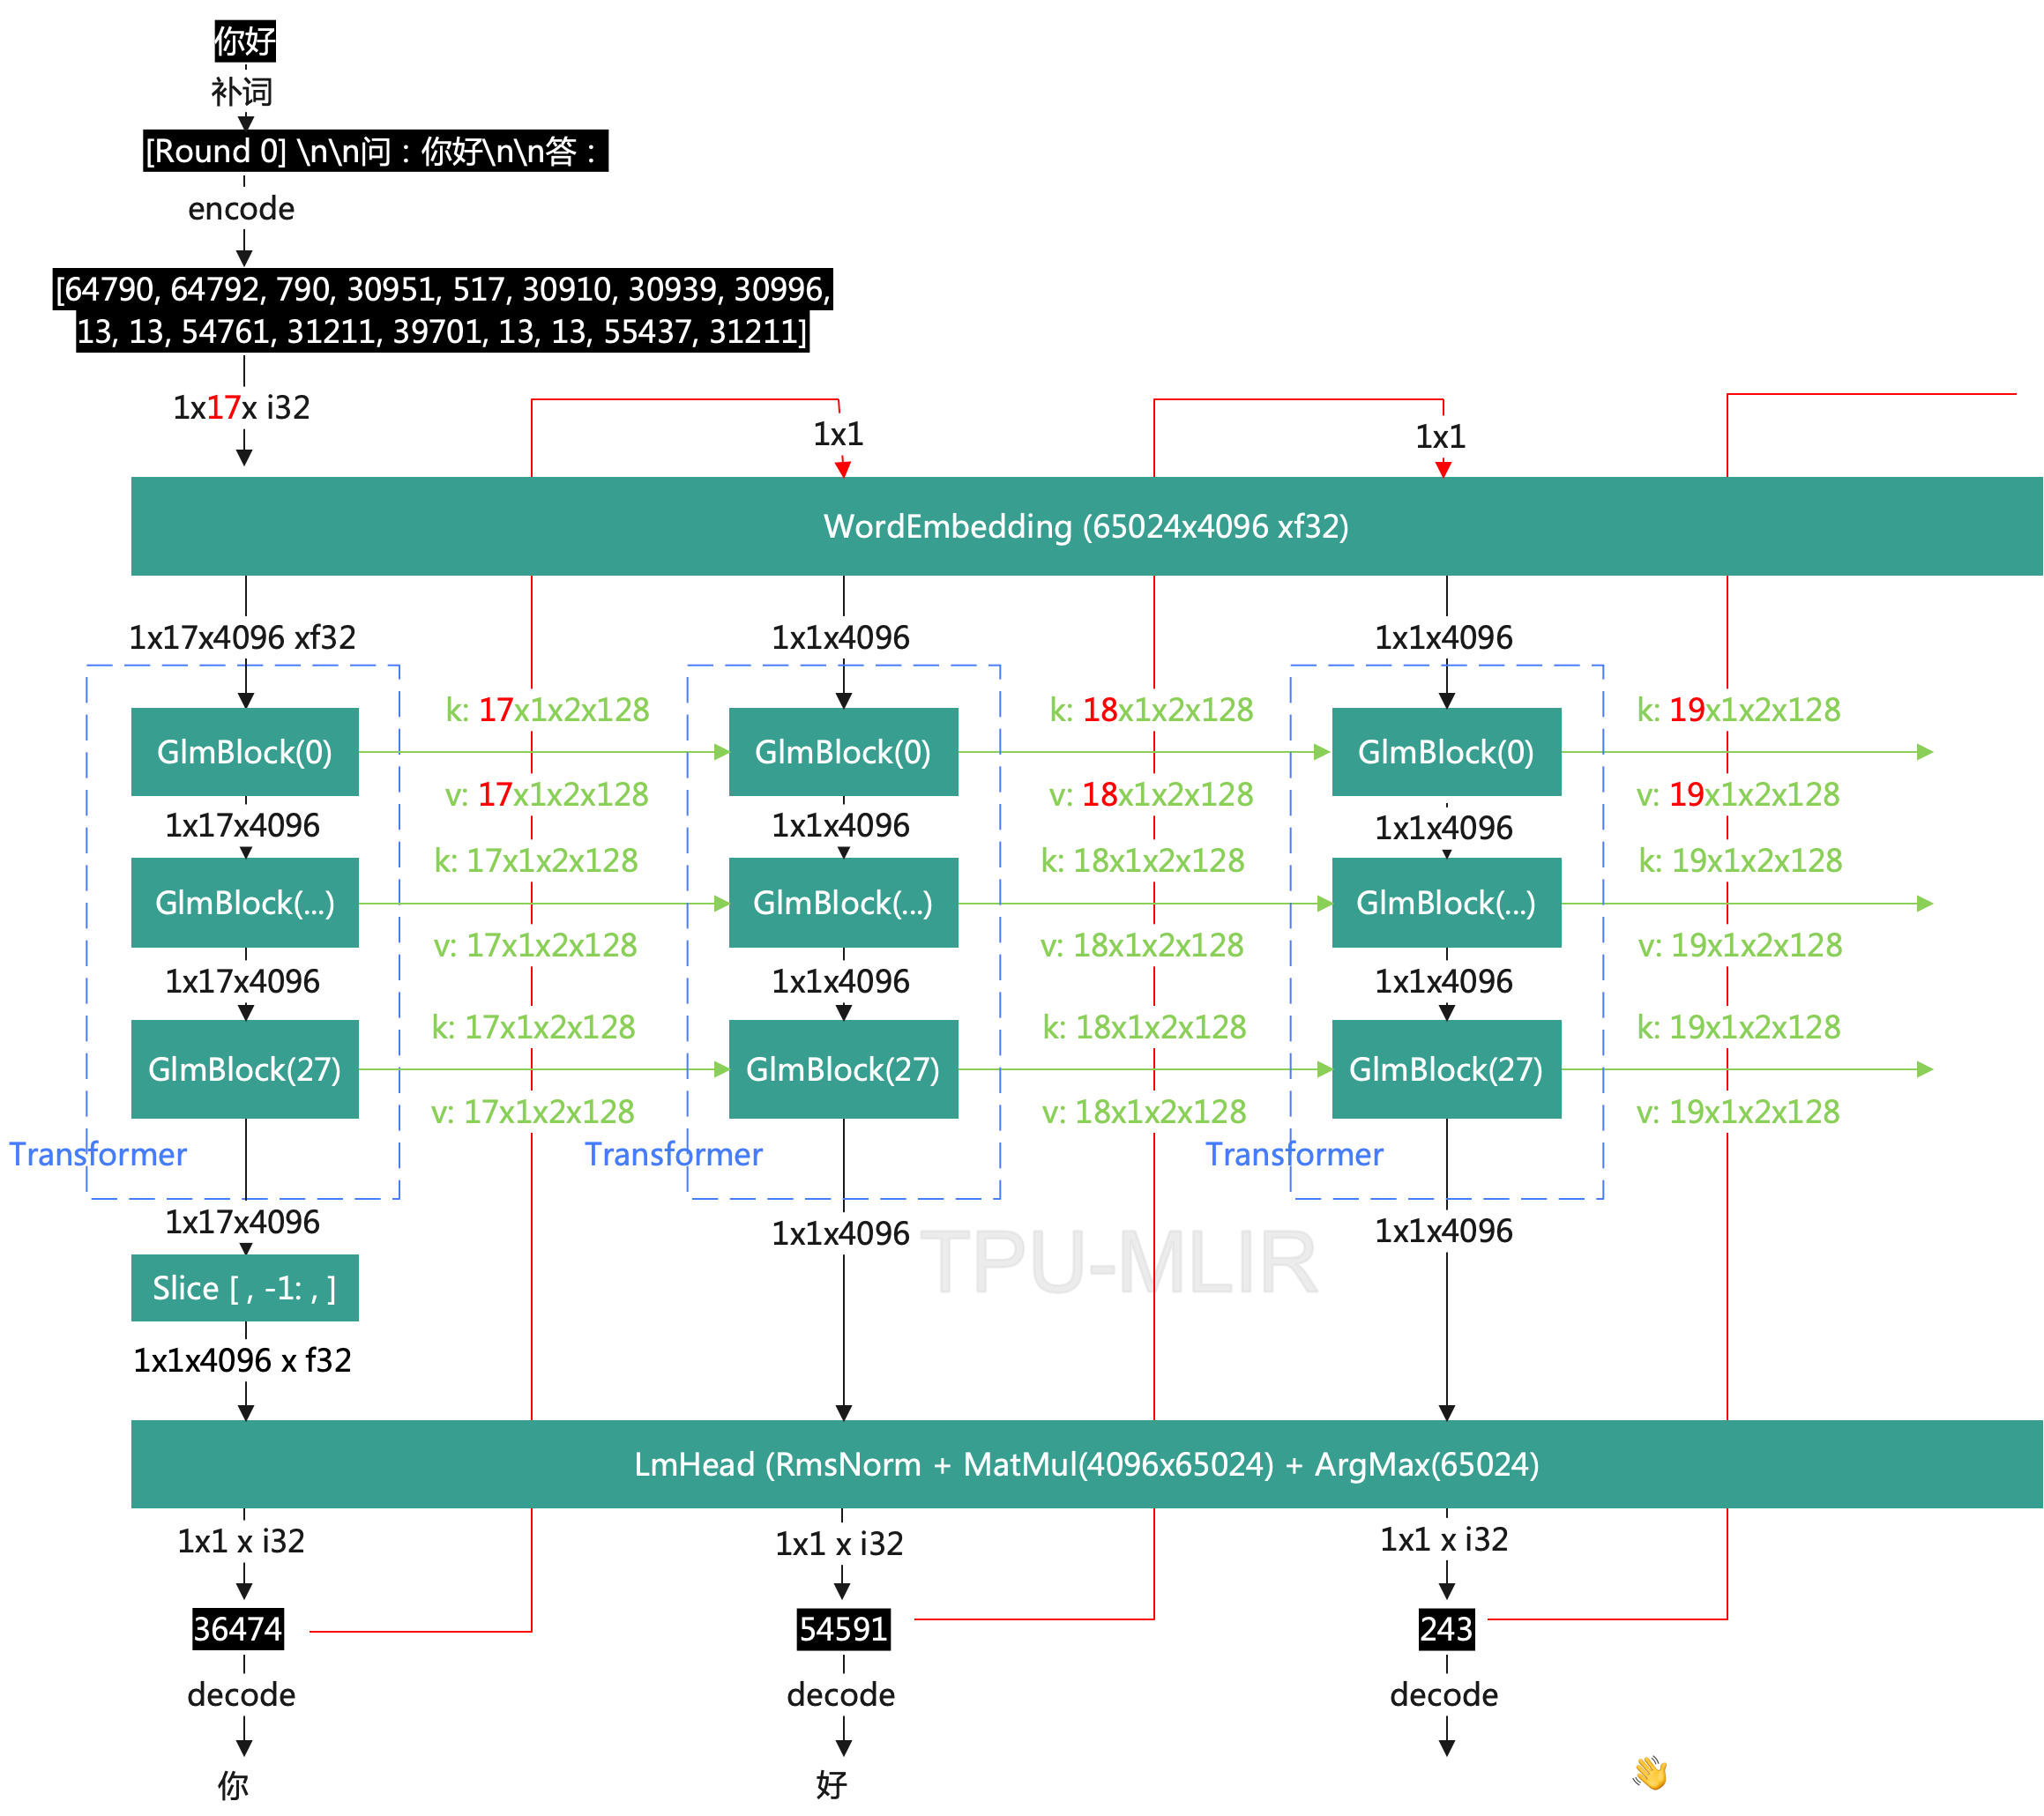
The network can be essentially divided into five stages, as shown in the diagram:
- Convert sentences into tokens through a tokenizer (using Google’s sentencepiece), resulting in data like
<1x17 xi32>in the diagram. Note that64790, 64792in the tokens are starting symbols. - Convert tokens into word vectors through WordEmbedding, yielding data
<1x17x4096 xf32>. - The Transformer performs neural network inference, and the inference result is
<1x17x4096 xf32>. The answer is on the last word vector, so an additional slice operation is performed to get<1x1x4096 xf32>. Here, the Transformer network is composed of 28 blocks, each block’s core is an Attention operation, and it outputs kv cache for the next round of Transform as input. - After the LmHead operation, a
<1x1 xi32>result is generated, which is the output Token. The composition of LmHead is shown in the figure. - The Token is converted into words through the tokenizer and passed to the next round of inference, entering the first stage. The process continues until
token == EOS_IDsignals the end.
Converting to Static Network#
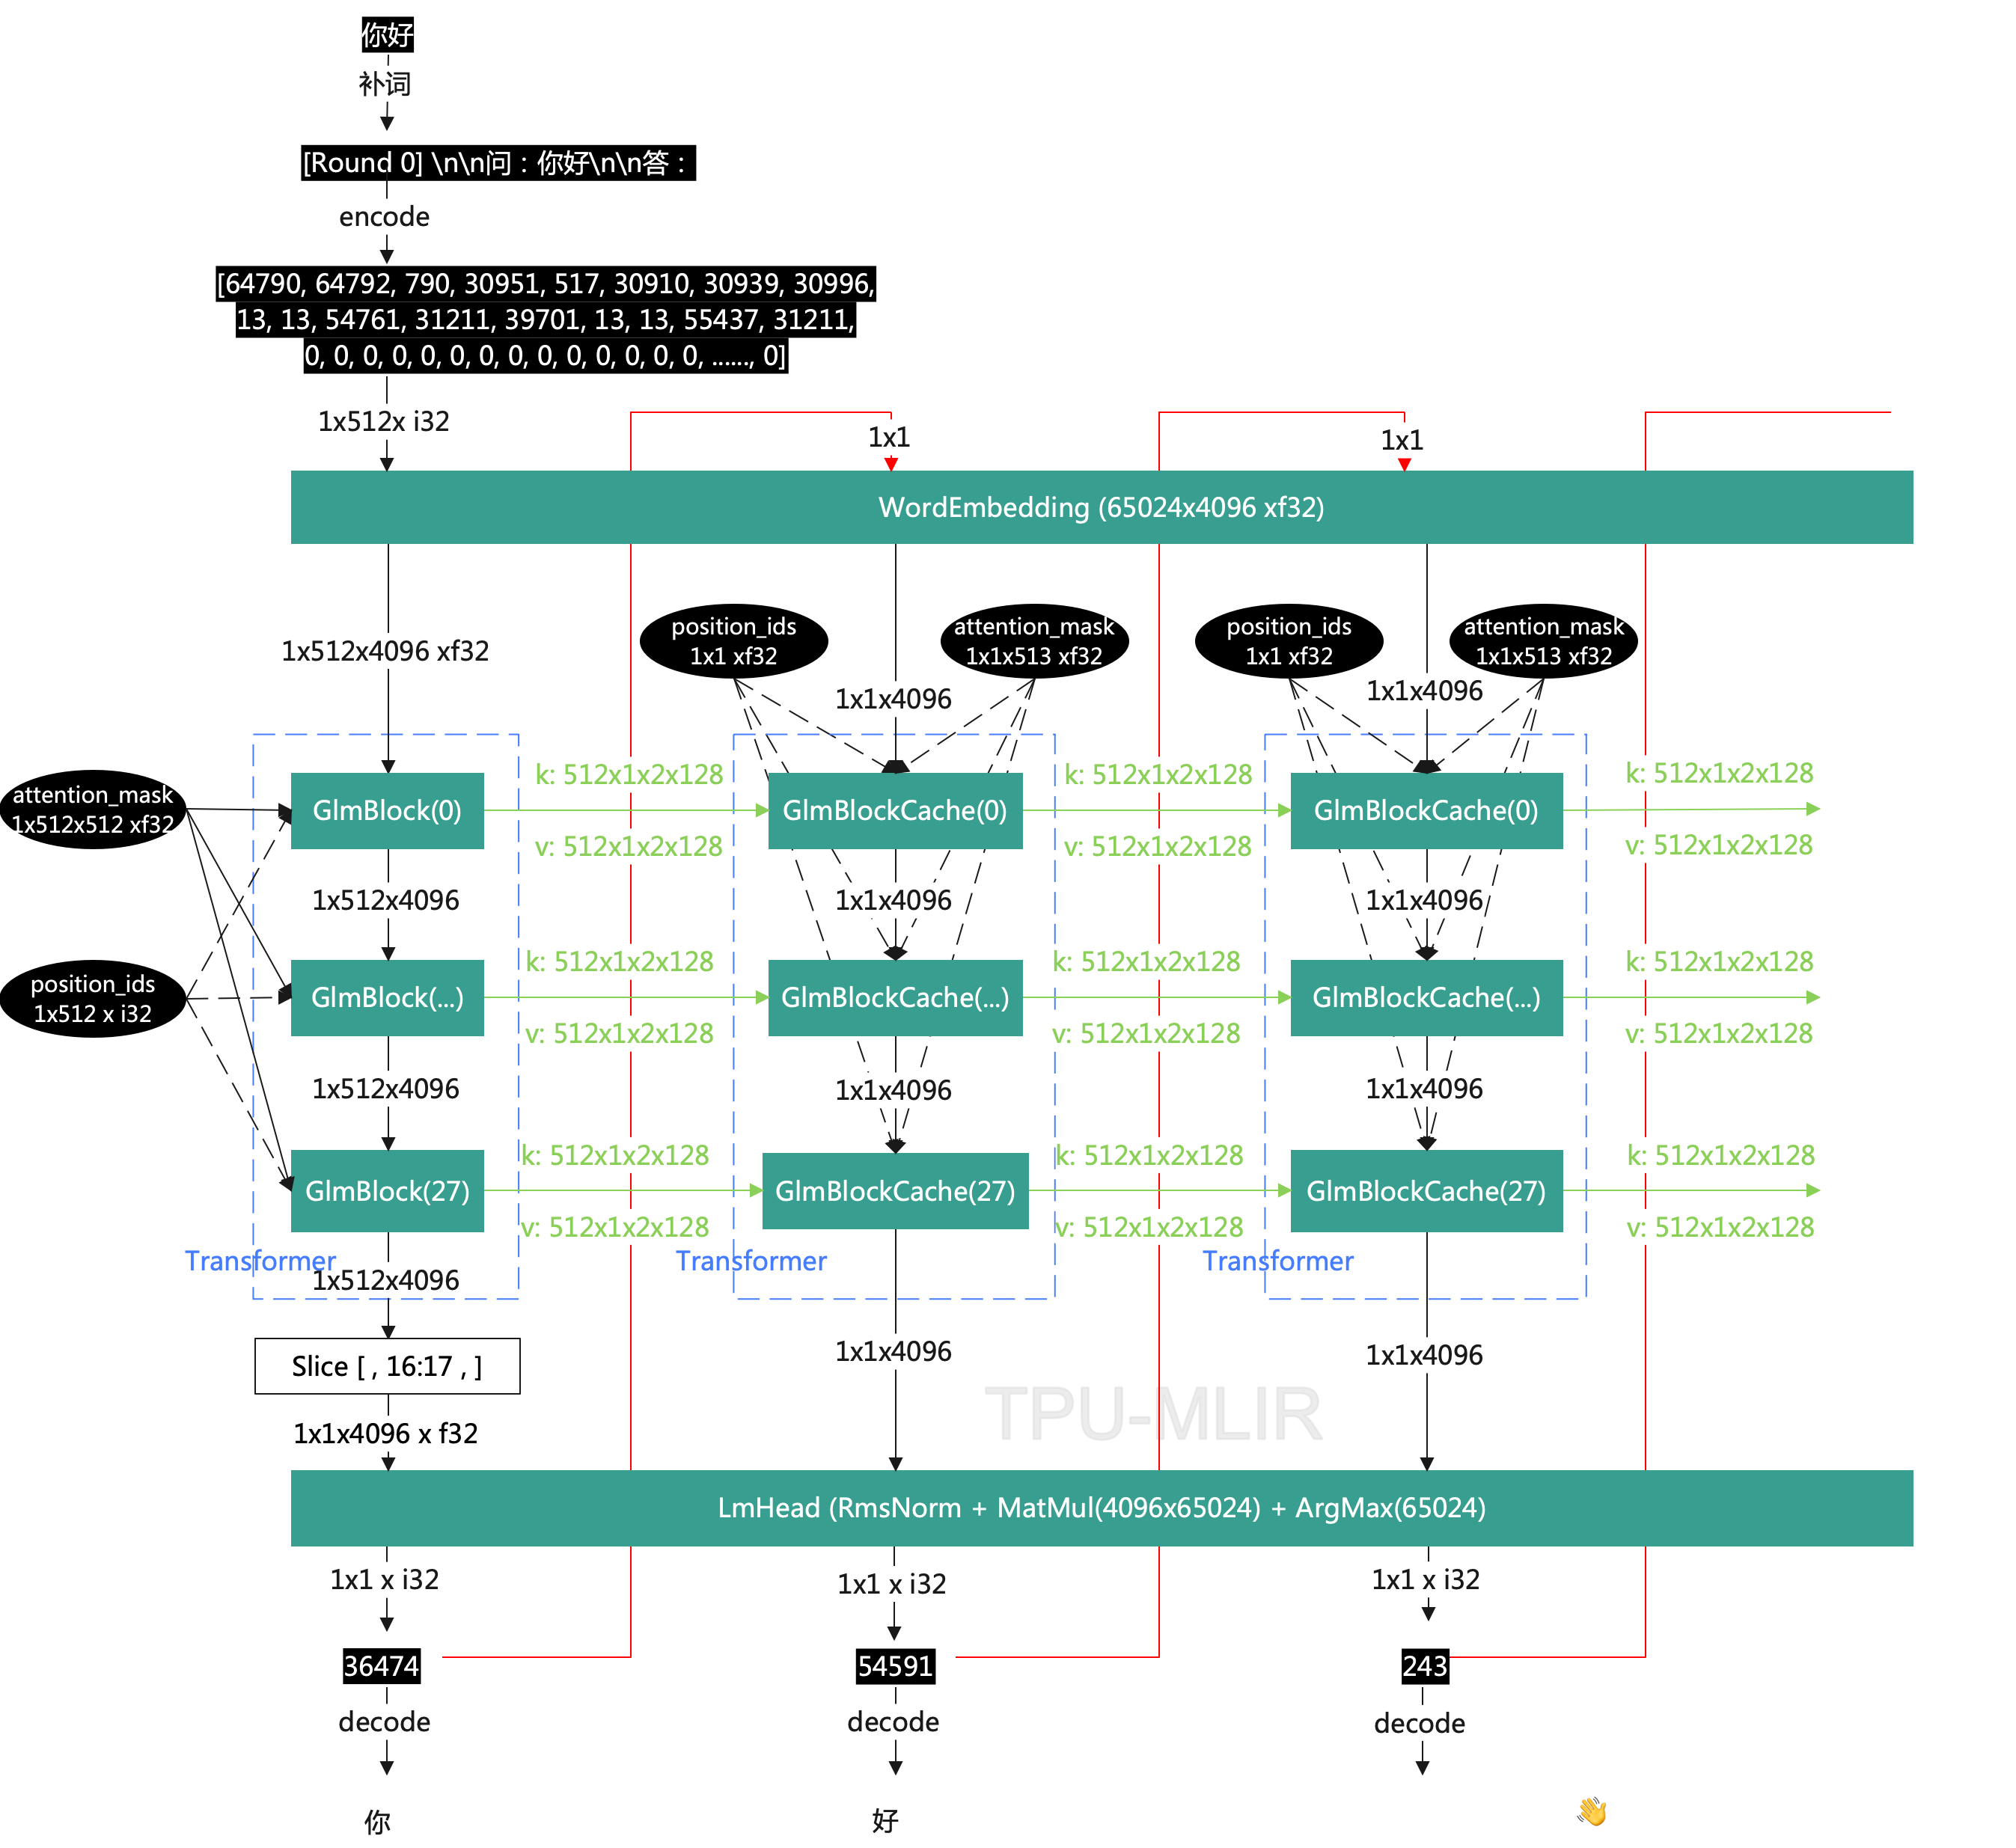
From the previous description of ChatGLM2-6B, we can see that there are two dynamic aspects. First, due to the different lengths of sentences, the input shape of the Transformer can be different. Second, the kv cache generated by each round of Transformer will gradually increase. To facilitate deployment, we convert it into a static network based on network characteristics. The operation process after conversion is as follows:

As seen in the figure, regardless of the length of the sentence, the converted tokens are always <1x512x i32>, and the data of kv cache is always <512x1x2x128x f32>.
Here we introduce the key points:
- Pad zeros to the end of the original tokens to convert from
<1x17x i32>to<1x512x i32>. - Extract
position_idsfrom GlmBlock and fix the length to<1x512x i32>, also padding zeros at the end. In this case, the value is[0,1,2,3,4,5,6,7,8,9,10,11,12,13,14,15,16,0,0,0,0,...0], which is used for position encoding. Because this part is variable length in the original network, it can be made fixed length after extraction. - Extract
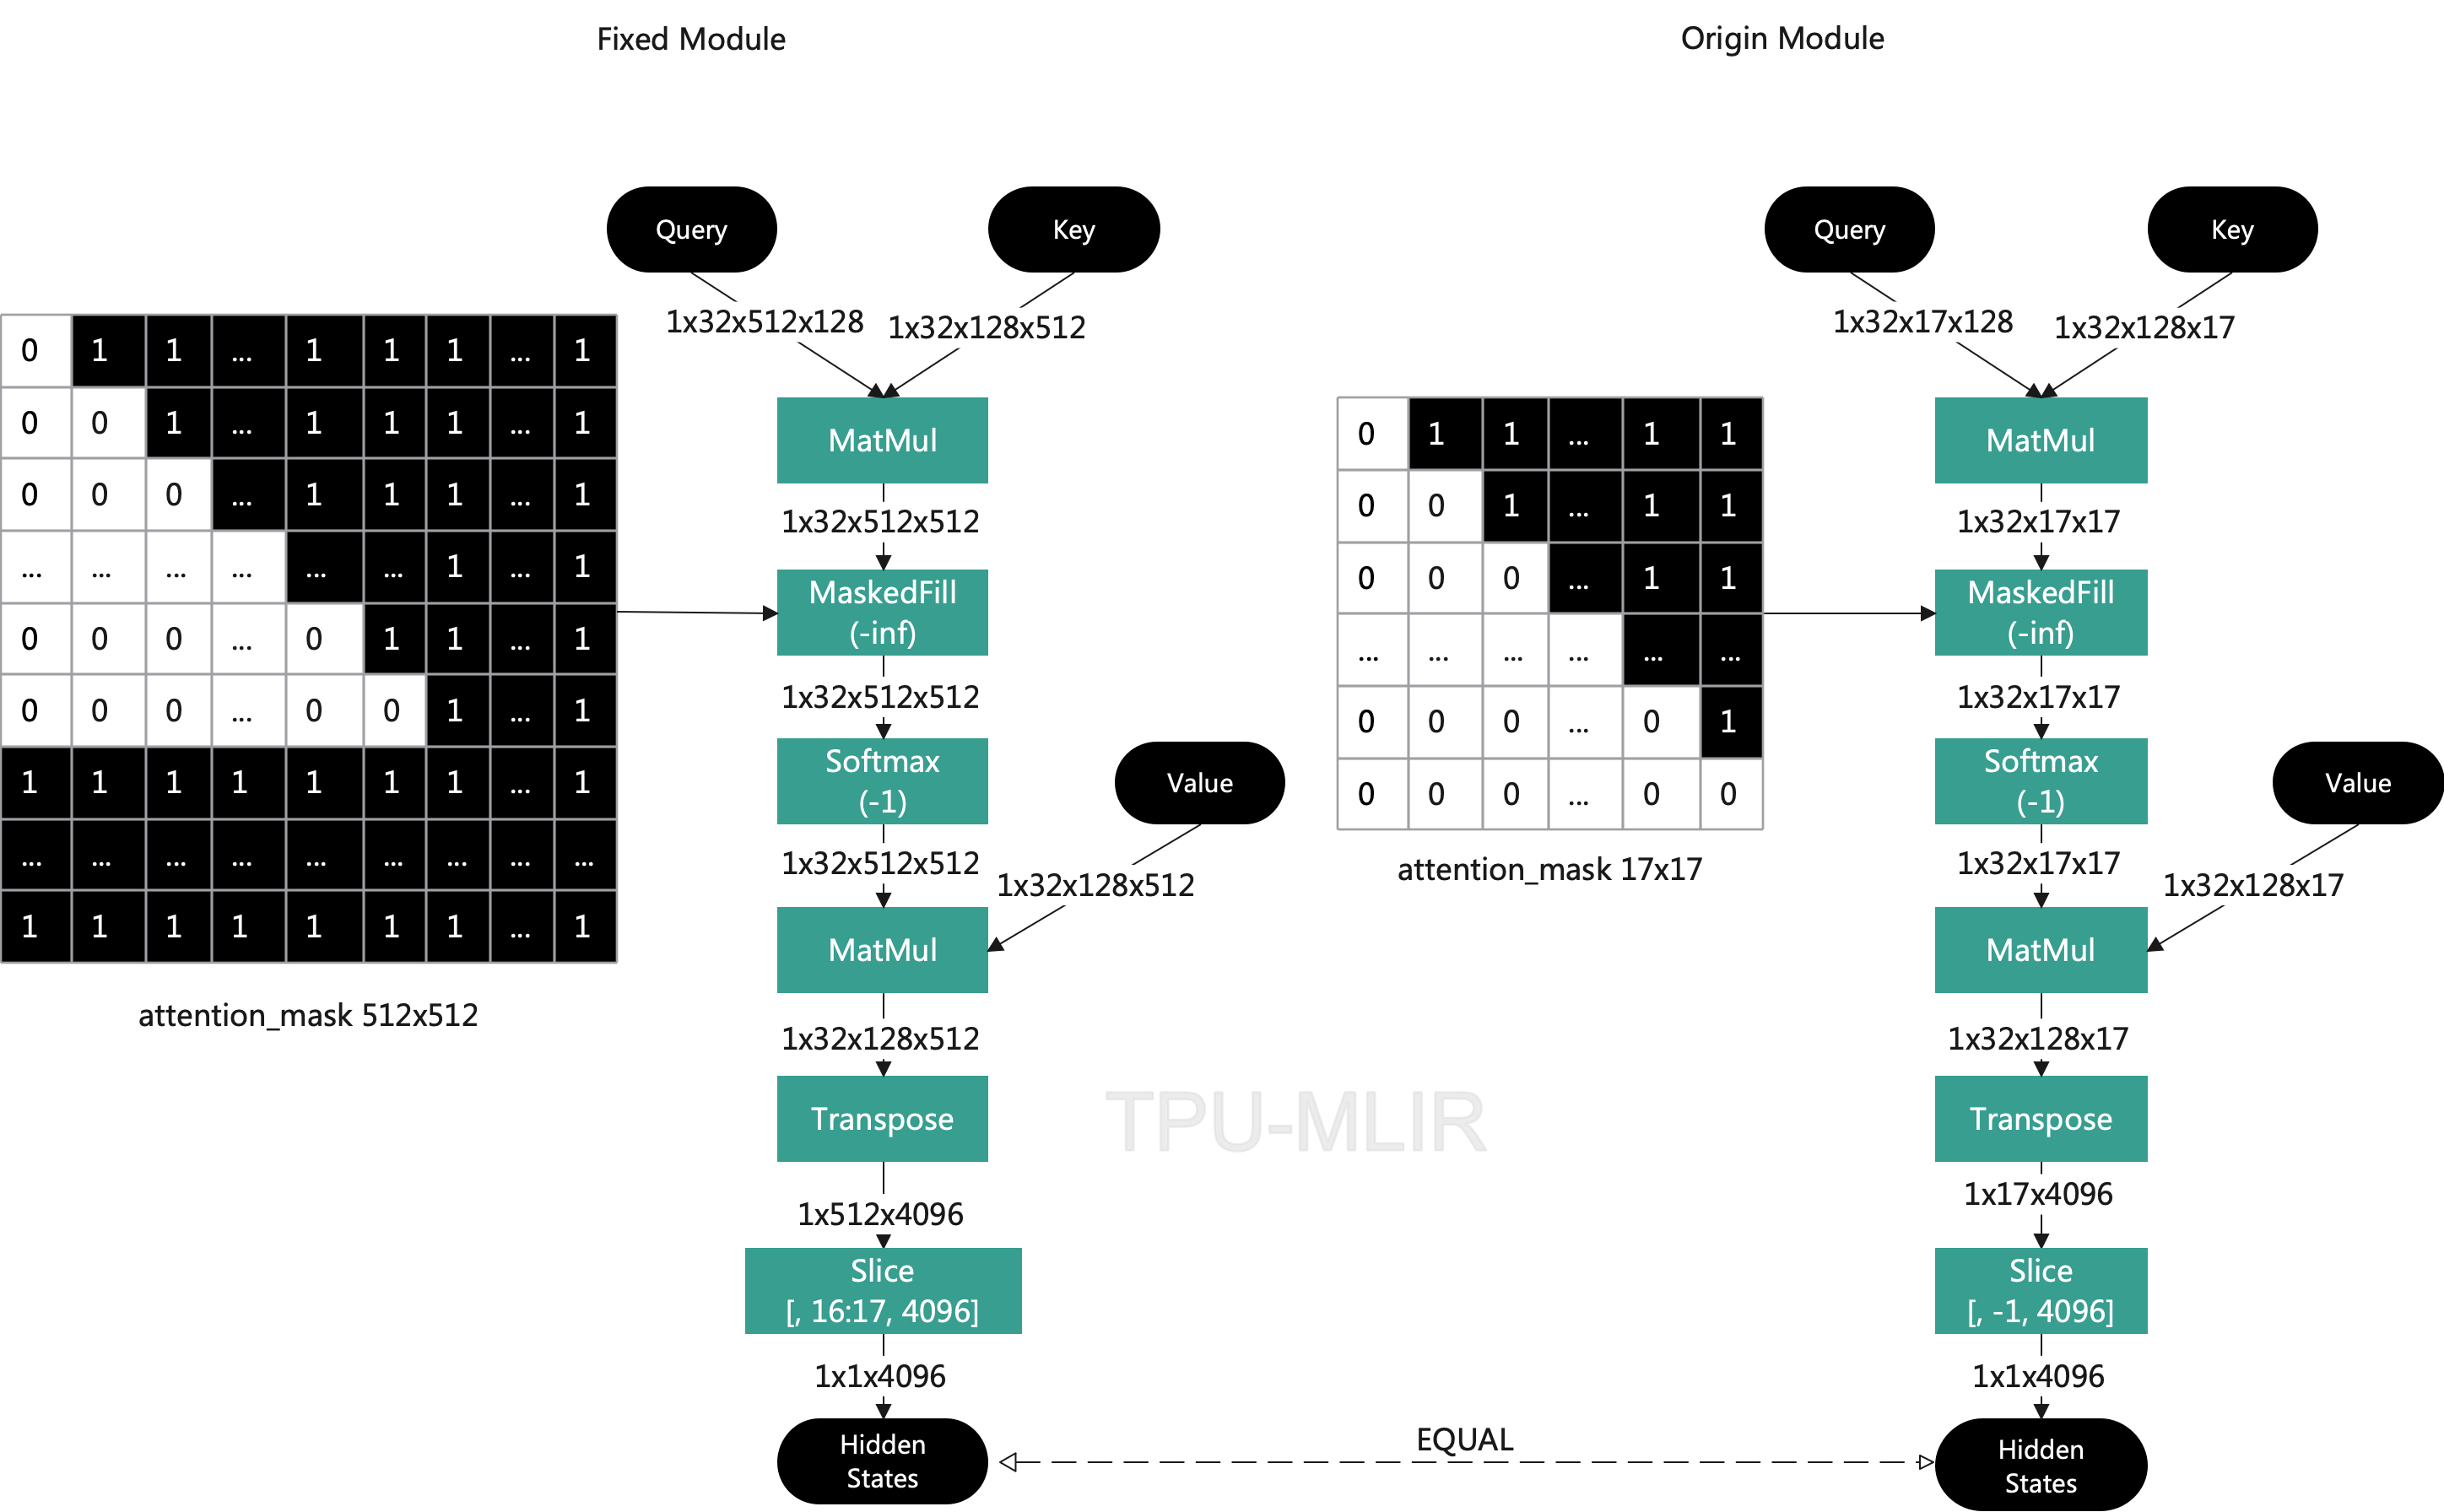
attention_maskfrom GlmBlock and fix the length to<1x512x512x f32>. Note that all invalid parts are padded with 1, because there will be amasked_filloperation later that sets all parts with a mask of 1 to-inf. Then after Softmax operation, all the excessive parts are cleared to 0, preserving the valid parts, thereby ensuring that the final result is consistent with the original result. The following figure simplifies Attention for illustrative purposes.

- After the first round of the Transformer, the valid part of kv_cache is
[0:17]. We move this part to the end[512-17:]and clear the head to 0. This is because the accumulation of kv cache happens at the end. Starting from the second round, after accumulation, we perform a Slice operation to remove one unit from the head, taking[1:], this ensures that kv cache always stays at 512. At the same time, the attention mask should also start from 0 at the actual token length at the end, and set all at the head to 1.
Export to ONNX#
The network is divided into four parts: WordEmbedding, GlmBlock, GlmBlockCache, and LmHead. Here we will separately introduce how these four parts are exported.
Before exporting, you need to specify the python path, as follows:
1 | export PYTHONPATH=/workspace/chatglm2-6b:$PYTHONPATH |
You need to load the original ChatGLM2-6B first, as shown in the following code:
1 | CHATGLM2_PATH = "/workspace/chatglm2-6b" |
WorkEmbedding#
Use word_embeddings directly from the original model, build it into an independent network, and export it.
1 | class Embedding(torch.nn.Module): |
GlmBlock#
You need to combine transformer.rotary_pos_emb and transformer.encoder.layers to build an independent network and export it. Since there are 28 blocks, 28 ONNX models need to be exported. Here, position_ids and attention_mask are used as external inputs, which have been introduced earlier. In fact, these 28 Blocks can be combined into one model, but doing so would make the ONNX weights too large (about 12GB for F16), which would make exporting and deployment cumbersome. Therefore, they are exported individually.
1 | class GlmBlock(torch.nn.Module): |
GlmBlockCache#
This is similar to GlmBlock, but it requires an extra kv cache parameter. Note that the first unit from the head will be removed in the end.
1 | class GlmBlockCache(torch.nn.Module): |
LmHead#
Here, topk is used after taking m_logits, but you can also use argmax, depending on which implementation is more efficient on the processor.
1 | class LmHead(torch.nn.Module): |
Deployment#
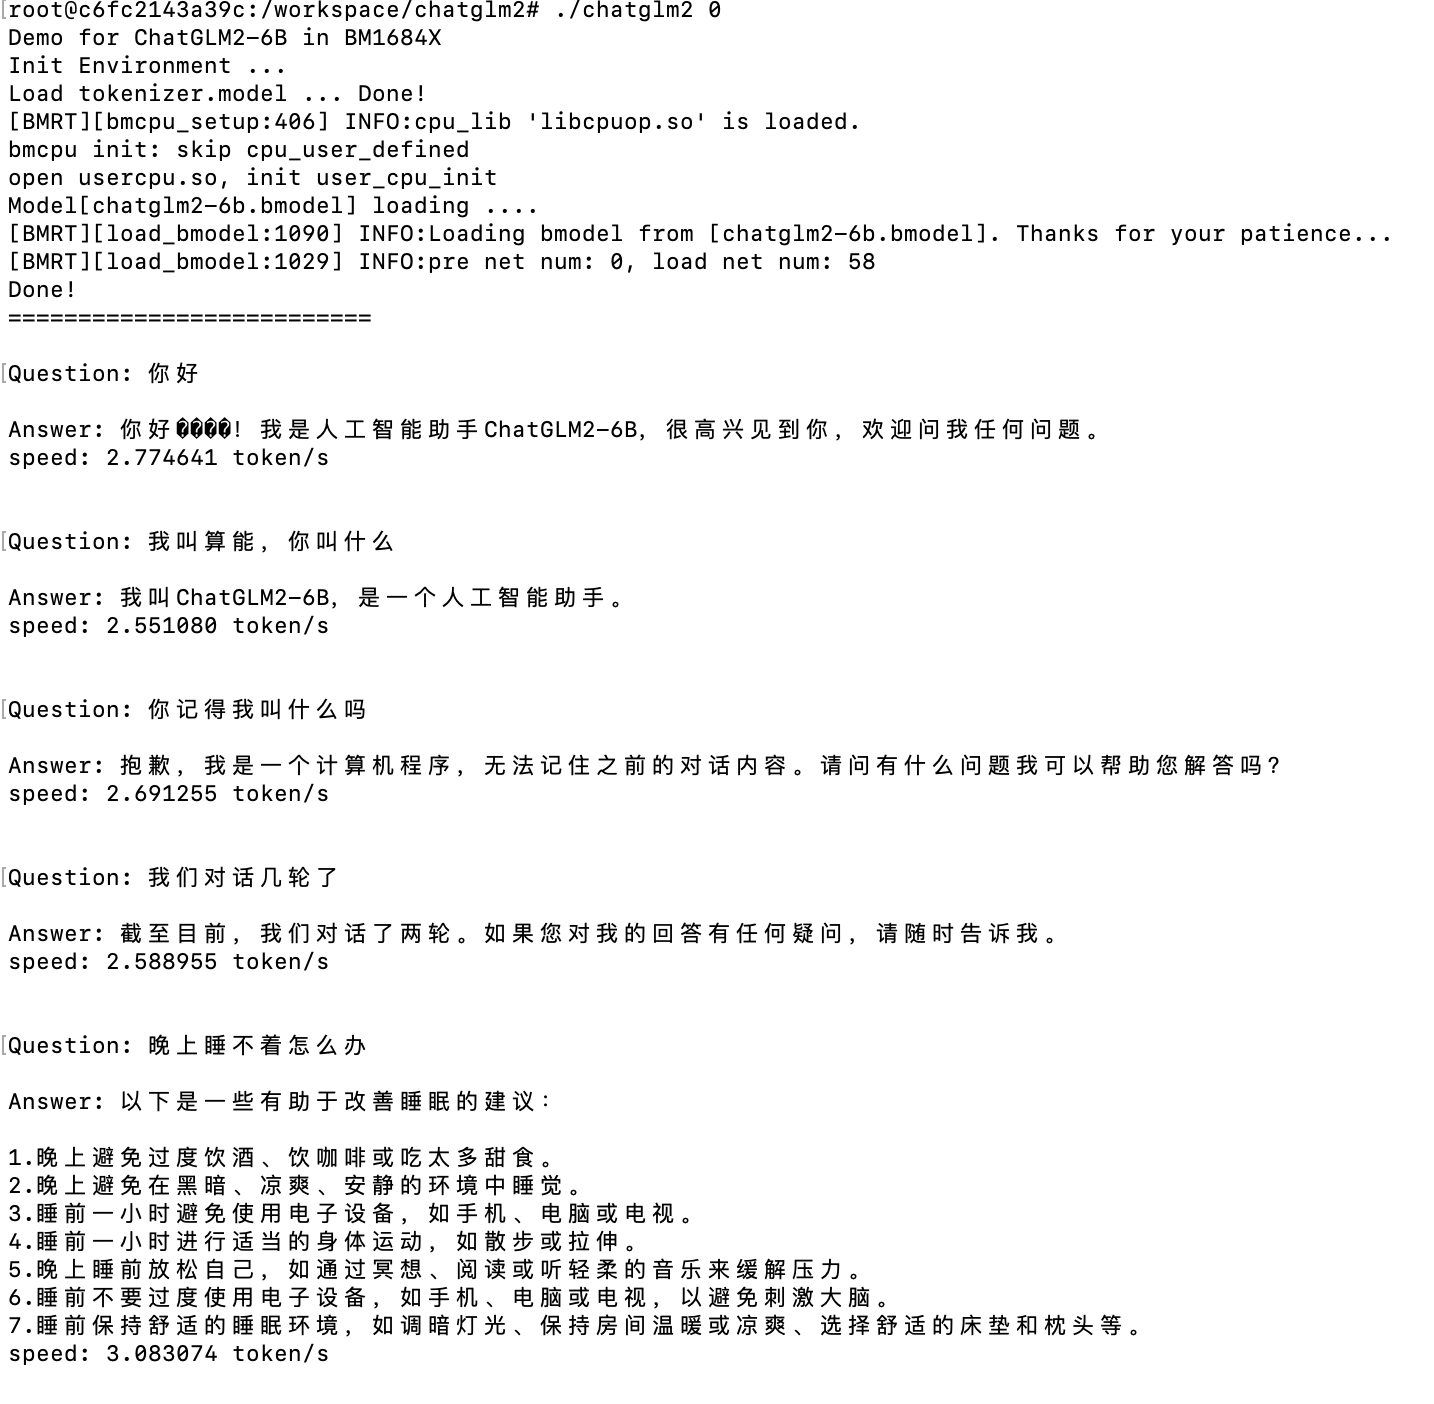
After the above conversion to ONNX models, they are all static networks. Through TPU-MLIR, they can be easily converted into F16 models. However, it’s important to note that RmsNorm needs to be in F32. Afterward, C++ code can be written according to the execution logic. The demonstration effect is as follows:
